There are many types of galleries for images that can be found on the internet, but we rarely find one displaying images so differently like this one. Those using Mac OS X will surely notice a lot of similarity with Time Machine and those who don't, I'm sure will enjoy this type of effect for viewing images.
SpaceGallery is a JQuery based slideshow / image gallery that performs overlaying in a visually appealing manner and provides a smooth fade out effect to images. This 3D image gallery lets you float through your pictures easily by enlarging them with an Apple-like animation.
To see the SpaceGallery slideshow in action, please visit this demo blog and click on the first image:
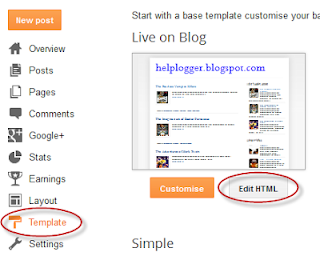
Step 1. Log in to your Blogger account and select your blog. Next, go to Template and click the Edit HTML button:
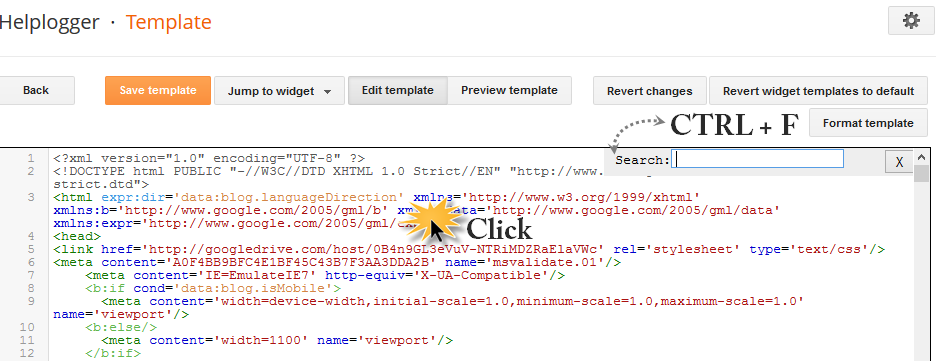
Step 2. Click anywhere on the code area and search by using the CTRL + F keys for this tag
Step 3. Just before/above the </head> tag, paste the following scripts:
Step 4. Next, search (CTRL + F) for this tag:
Step 7. Finally, go to Layout > Add a Gadget > HTML/Javascript and copy-paste the code below:
If you want to add this slideshow inside a post, go to your dashboard and create a New Post, then paste the code in the HTML section.
That's it! Now, you can enjoy this simple image gallery on your blog and although, it has no display options or settings, it is without a doubt a gallery that will draw the attention of your readers.
Source: eyecon.ro
SpaceGallery is a JQuery based slideshow / image gallery that performs overlaying in a visually appealing manner and provides a smooth fade out effect to images. This 3D image gallery lets you float through your pictures easily by enlarging them with an Apple-like animation.
To see the SpaceGallery slideshow in action, please visit this demo blog and click on the first image:
How to Add Spacegallery Image Slideshow to Blogger
To implement this gallery is very easy. Just follow the steps below:Step 1. Log in to your Blogger account and select your blog. Next, go to Template and click the Edit HTML button:
Step 2. Click anywhere on the code area and search by using the CTRL + F keys for this tag
</head>
Step 3. Just before/above the </head> tag, paste the following scripts:
<script src='http://ajax.googleapis.com/ajax/libs/jquery/1.10.2/jquery.min.js' type='text/javascript'/>Note: if you have already jQuery in your template, please delete the line in red.
<script src='http://helplogger.googlecode.com/svn/trunk/SpaceGallery/eye.js' type='text/javascript'/>
<script src='http://helplogger.googlecode.com/svn/trunk/SpaceGallery/utils.js' type='text/javascript'/>
<script src='http://helplogger.googlecode.com/svn/trunk/SpaceGallery/spacegallery.js' type='text/javascript'/>
<script type='text/javascript'>
//<![CDATA[
(function($){
var initLayout = function() {
var hash = window.location.hash.replace('#', '');
var currentTab = $('ul.navigationTabs a')
.bind('click', showTab)
.filter('a[rel=' + hash + ']');
if (currentTab.size() == 0) {
currentTab = $('ul.navigationTabs a:first');
}
showTab.apply(currentTab.get(0));
$('#myGallery').spacegallery({loadingClass: 'loading'});
};
var showTab = function(e) {
var tabIndex = $('ul.navigationTabs a')
.removeClass('active')
.index(this);
$(this)
.addClass('active')
.blur();
$('div.tab')
.hide()
.eq(tabIndex)
.show();
};
EYE.register(initLayout, 'init');
})(jQuery)
//]]>
</script>
Step 4. Next, search (CTRL + F) for this tag:
]]></b:skin>Step 5. Above the ]]></b:skin> tag, paste the following CSS style:
#myGallery {Step 6. Hit the Save template button to save the changes.
width: 100%;
height: 400px;
}
#myGallery img {
border: 2px solid #52697E;
}
a.loading {
background: url(https://blogger.googleusercontent.com/img/b/R29vZ2xl/AVvXsEi-PwJtezJH_VOoIphO2K6oauagCYxSXbqXQCk448GO89x_ZKRWP1R-8HW01es_gcj6OiQFQkQA3oNqANsYS1_bVhhUjxLSYPCLCRvsMFxE3t0TRiKJYUm1IniWXcgJgWG7BDIHMze1PRba/s1600/ajax_small.gif) no-repeat center;
}
.spacegallery {
position: relative;
overflow: hidden;
}
.spacegallery img {
position: absolute;
left: 50%;
}
.spacegallery a {
position: absolute;
z-index: 1000;
display: block;
top: 0;
left: 0;
width: 100%;
height: 100%;
}
Step 7. Finally, go to Layout > Add a Gadget > HTML/Javascript and copy-paste the code below:
<div class="spacegallery" id="myGallery">Replace the Image URL text with the image addresses that you want to appear on the gallery, considering that the last image is the first to be displayed.
<img src="Image URL"/>
<img src="Image URL"/>
<img src="Image URL"/>
<img src="Image URL"/>
<img src="Image URL"/>
</div>
If you want to add this slideshow inside a post, go to your dashboard and create a New Post, then paste the code in the HTML section.
That's it! Now, you can enjoy this simple image gallery on your blog and although, it has no display options or settings, it is without a doubt a gallery that will draw the attention of your readers.
Source: eyecon.ro


thanks for the ideals.
I cant change the height and weight of the image, I've put height="" and width='"" in to the img src but it wont change the size please help me
Hello,
Same issue for me. Can't change the size of the slideshow.
I did try to change the CSS properties of img, but that overrides the sizes of images in the background...
Anyone to help?
Thanks ni advance.
did work 4 me wats happening?
its not working :(
This is awsome! I would love to use this, but as I took the photo urls from my blog (where photos are all different sizes) and made a widget out of them, the photos are shown only partly. So - what is the photo size requirement??? To be able to make this work. I would love to use this, but now I just can't as only a small part of the photo is seen. Thanks in advance for your help! Bette
Please go to the HTML of your post or widget where you have the URLs of your pics and see if they have this part /s1600/ (it could be of any other value, it's important to have the s (from size) in front of it). You need to replace the 1600 value with 310. If you want to be of a larger size, you will need to change the height of the container as well (400px from #myGallery { )
If you don't have that part, add the attributes in bold inside the HTML structure of your pic:
<img src="Image URL" height="300px" width="400px" />
I hope this will work for you ;)
Hi admin,
How can I add paragraph for each picture as I want to use it to do tips for the post. And, I did add Orbit jQuery Image Slider plugin, do I need to remove it before I add this. Thanks.
It is not working like demo. When clicking on image it is sliding from right to left but not center. Can you fix the issue. here is my blog: www.jamshaidraza.blogspot.com Thanks in advances.